I'm sure some disagree, but I believe if Ubuntu, and Linux in general, had a better answer for Microsoft Office compatibility it would open up the floodgates to adoption by the business community. Until that time, the adoption rate within the business community will be slow.
I currently run Ubuntu 10.04 both at home, and at work. I've been running Ubuntu Linux since 2007 when I began using Ubuntu Feisty Fawn (7.04). Since that time I've gradually migrated all of my personal systems from Windows, with the exception of a couple of Macs. I consider those migrations a major step for someone who started his career administering Windows servers and had an MCSE in Microsoft Windows NT 4.0. At home I am able to work my way around the few minor annoyances that still come up. I run a Windows XP virtual machine in order to run Apple's iTunes software. Although the Music One store within Ubuntu has come a long way, it still does not measure up to the capability to create Genius mixes within iTunes and also leverage Genius in order to identify new music. Additionally, functional iPod playlist management still seems to elude the developers of Rhythmbox, so I end up running Rhythmbox to purchase/download music or I download from the Amazon music store... then I run gtkpod to create and manage playlists. Each of these issues are mildly annoying, but I am willing to deal with them given the many benefits of running Ubuntu Linux.
Similarly, I began running Ubuntu Linux on my work systems some years ago. I own a small business, and I find it very advantageous to have free software that runs great on older systems without a ton of overhead, doesn't require constant monitoring for viruses/spyware, has great community support, and offers plenty of software with great functionality. I have found many great open source software products to do most everything I need... however a major issue for me continues to exist in the area of office applications.
I'm currently running Open Office 3.2, which comes with Ubuntu. I've installed a number of Open Office plugins as well. Although Open Office is great in working with documents in Open Office format, I have found sharing and collaborating with customers and partners who run Microsoft Office to be painful. Whether it is dealing with Microsoft Word formatted contract documents with change tracking, sophisticated spreadsheets, or working together on an Microsoft PowerPoint formatted slide presentation, Open Office simply cannot deal with detailed formatting. The same issue exists with Google Docs. Although Google Docs is an excellent platform for sharing and collaborating, it does not handle detailed formatting in complex documents when exchanging multiple document versions with Microsoft Office users. Unfortunately, in order to work effectively with both customers and partners, I've had no other choice than to purchase copies of MS Office. Of course, I can run Microsoft Office on my Windows XP virtual machine, but at that point it starts to defeat the purpose of running Ubuntu Linux in the first place.
With version 11 release of Ubuntu (Natty Narwal) coming on Apr 28, Open Office is no longer the default office suite that comes with Ubuntu, it is now LibreOffice. However, while LibreOffice does mark a break with the Sun/Oracle control of direction for the OpenOffice codebase, it does not offer any significant new functionality for open source software users at this time... at least not yet.
This is the reality of the business user community. My customers and partners all run Microsoft Office, and although I anxiously await the day when this is no longer true... in order to work effectively with them I must have Microsoft Office.
Thursday, April 28, 2011
Sunday, April 24, 2011
Wordpress Plugin: WP Super Cache on Ubuntu 10.04
I am in what is perhaps a unique situation... I started using Blogger a while back for my personal blog, but my business site is hosted at GoDaddy.com and uses WordPress 3.1.1. I've found WordPress to be an excellent web platform, and at this point I'm debating continuing to use Blogger, but I suppose I'll figure that out at some point later... One issue I ran into was performance of my business website using WordPress. After some research, I decided to try out the WP Super Cache plugin in order to improve response times for page requests. Funnily enough, it turned out to be much easier to install and configure the WP Super Cache plugin on GoDaddy.com than on my local server. Of course, by the time I installed on GoDaddy I had spent some time with it and was a bit more familiar with it. That said, the GoDaddy.com folks seem to have all permissions and pre-requisites in place in order to use this plugin, because it installed and activated without any issues at all.
I set up a WordPress test environment on a machine running Ubuntu 10.04 so that I can implement and preview all changes prior to rolling them out live. There are a lot of instructions, notes, and other items related to installing the WP Super Cache plugin, however nothing seemed to work for my particular configuration. I ended up having to do quite a bit of searching around to figure out how to get everything to work and so I decided to document what I found to work on my system. My server config:
You can download it here, or within the WordPress management console.
STEP 2 - Extract plugin files to WordPress Plugin directory and set permissions
The WordPress plugin directory is located in
Set permissions via the command line:
STEP 3 - Install required modules for Apache
After installing all required modules you will need to restart Apache, however wait until after the following tasks to do this, as otherwise you'll have to do it twice.
STEP 4 - Add configuration entries for Apache
Edit the following files located in /etc/apache2/sites-available:
Here's what I have at the top of the wordpress file:
Here's what I have at the top of the default file:
Now restart apache:
STEP 5 - Activate Permalinks within WordPress
The WP Super Cache plugin requires that "pretty links" be enabled in order to function. This is of course also beneficial for aesthetic reasons, as well as SEO, but is also a necessary step here. All you have to do is select something other than the default. You can either use one of the available options such as Day and Name or Month and Name. If you don't like any of the available options, see the WordPress Permalink documentation for some of the other variables to construct you own structure and put it into the custom field.
STEP 6 - Activate WP Super Cache plugin within WordPress and configure
Once you've completed all of the steps above, you should be able to activate the WP Super Cache plugin within the Plugin screen of the WordPress Admin Console and then enable caching.
Once you've activated the WP Super Cache plugin go to the WP Super Cache Control Panel under Settings in the WordPress Admin Console. Select the radio button next to Caching On (Recommended)
Once you do this, if you scroll down the settings page, you will probably see a notification about needing to update the .htaccess file in the WordPress directory. Provided the permissions are correctly set in your root WordPress directory, WordPress should have generated an .htaccess file for you and inserted the appropriate entries when you changed your Permalinks setting to a custom definition. If you get error messages about .htaccess make sure that the following permissions are set on your WordPress directory:
Once that is done, WordPress should be able to update your .htaccess file without issue. Scroll down the settings page and look for a notification that your Mod Rewrite rules are out of sync and need to be updated. Click on the Update Rewrite Rules button and you should see a screen similar to that below.
I also enabled a few options under the Advanced tab, which I can confirm work fine on GoDaddy.com
Good luck, hopefully this works for you too.
I set up a WordPress test environment on a machine running Ubuntu 10.04 so that I can implement and preview all changes prior to rolling them out live. There are a lot of instructions, notes, and other items related to installing the WP Super Cache plugin, however nothing seemed to work for my particular configuration. I ended up having to do quite a bit of searching around to figure out how to get everything to work and so I decided to document what I found to work on my system. My server config:
Ubuntu 10.04STEP 1 - Download WP Super Cache plugin
WordPress 3.1.1
Apache2 (standard install via synaptic)
New install of WP Super Cache plugin (I did not have the WP Cache plugin)
You can download it here, or within the WordPress management console.
STEP 2 - Extract plugin files to WordPress Plugin directory and set permissions
The WordPress plugin directory is located in
../wordpress_root/wp-content/plugins
Set permissions via the command line:
user@host:$ cd ../wordpress_root/wp-content/plugins
user@host:$ sudo chmod -R 0755 wp-super-cache
STEP 3 - Install required modules for Apache
rewriteThe command to install these modules is
mime (this was already installed on my system)
headers
expires
user@host:$ sudo a2enmod rewrite
After installing all required modules you will need to restart Apache, however wait until after the following tasks to do this, as otherwise you'll have to do it twice.
STEP 4 - Add configuration entries for Apache
Edit the following files located in /etc/apache2/sites-available:
wordpressI just executed the following command to edit in gedit:
default* - Make sure you edit this file as well as the wordpress file, I failed to do so initially and it took me quite a bit of troubleshooting before I made the same changes to default and got things to work.
user@host:$ sudo gedit /etc/apache2/sites-available/wordpress
Here's what I have at the top of the wordpress file:
<virtualhost *:80="">
 ServerAdmin webmaster@localhost

 DocumentRoot /var/www/wordpress
 <directory>
  Options FollowSymLinks
  AllowOverride All
 </directory>
 <directory var="" www="">
  Options Indexes FollowSymLinks MultiViews
  AllowOverride All
  Order allow,deny
  allow from all
 </directory>
Here's what I have at the top of the default file:
<virtualhost *:80="">
 ServerAdmin webmaster@localhost

 DocumentRoot /var/www
 <directory>
  Options FollowSymLinks
  AllowOverride All
 </directory>
 <directory var="" www="">
  Options Indexes FollowSymLinks MultiViews
  AllowOverride All
  Order allow,deny
  allow from all
 </directory>
</virtualhost>
Now restart apache:
user@host:$ sudo /etc/init.d/apache2 restart
STEP 5 - Activate Permalinks within WordPress
The WP Super Cache plugin requires that "pretty links" be enabled in order to function. This is of course also beneficial for aesthetic reasons, as well as SEO, but is also a necessary step here. All you have to do is select something other than the default. You can either use one of the available options such as Day and Name or Month and Name. If you don't like any of the available options, see the WordPress Permalink documentation for some of the other variables to construct you own structure and put it into the custom field.
 |
| Permalink Settings in WordPress Admin Console |
STEP 6 - Activate WP Super Cache plugin within WordPress and configure
Once you've completed all of the steps above, you should be able to activate the WP Super Cache plugin within the Plugin screen of the WordPress Admin Console and then enable caching.
Once you've activated the WP Super Cache plugin go to the WP Super Cache Control Panel under Settings in the WordPress Admin Console. Select the radio button next to Caching On (Recommended)
 |
| Enable Caching in WP Super Cache Settings |
Once you do this, if you scroll down the settings page, you will probably see a notification about needing to update the .htaccess file in the WordPress directory. Provided the permissions are correctly set in your root WordPress directory, WordPress should have generated an .htaccess file for you and inserted the appropriate entries when you changed your Permalinks setting to a custom definition. If you get error messages about .htaccess make sure that the following permissions are set on your WordPress directory:
user@host:$ sudo chown -R user:www-data [wordpress_root_directory_location]/wordpress
user@host:$ sudo chmod -R 0755 [wordpress_root_directory_location]/wordpress
Once that is done, WordPress should be able to update your .htaccess file without issue. Scroll down the settings page and look for a notification that your Mod Rewrite rules are out of sync and need to be updated. Click on the Update Rewrite Rules button and you should see a screen similar to that below.
 |
| Apache mod rewrite rules updated successfully by WordPress |
I also enabled a few options under the Advanced tab, which I can confirm work fine on GoDaddy.com
 |
| Advanced tab under WP Super Cache Settings |
Good luck, hopefully this works for you too.
Saturday, April 16, 2011
pdftk - Awesome Tool for Working with PDF Files
PDFTK
I happened upon pdftk a few months back when searching for an open source tool for working with PDF files on Ubuntu 10.04. pdftk is a command line tool that runs on many Linux variants, Mac OS, and Windows. Although not a full fledged PDF editor, pdftk is a great tool for manipulating existing PDF documents via the command line.
The main activities I've used pdftk for:
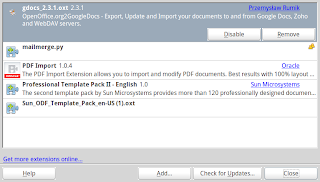
PDF Import Extension for Open Office
The PDF import extension for Open Office has worked well in certain situations, however it does not do well with tables and a lot of custom formatting. However, for editing and republishing PDFs with basic formatting, it works like a champ.
Open Office extensions are very easy to install via the Extension Manager. However, here is a guide if this is your first time using Open Office extensions.
pdfedit
pdfedit is another option that I've seen referenced numerous times. I've played with it only a little. It looks to me like a rather technical tool for someone who has taken the time to really figure out their way around the internal structure of a PDF. I'm sure pdfedit has it's advantages. I'll post more once I've had a chance to really evaluate it.
I happened upon pdftk a few months back when searching for an open source tool for working with PDF files on Ubuntu 10.04. pdftk is a command line tool that runs on many Linux variants, Mac OS, and Windows. Although not a full fledged PDF editor, pdftk is a great tool for manipulating existing PDF documents via the command line.
The main activities I've used pdftk for:
- merging multiple PDF documents
- splitting a PDF into multiple documents
- adding pages to a PDF
- rotating pages within a PDF
PDF Import Extension for Open Office
The PDF import extension for Open Office has worked well in certain situations, however it does not do well with tables and a lot of custom formatting. However, for editing and republishing PDFs with basic formatting, it works like a champ.
Open Office extensions are very easy to install via the Extension Manager. However, here is a guide if this is your first time using Open Office extensions.
pdfedit
pdfedit is another option that I've seen referenced numerous times. I've played with it only a little. It looks to me like a rather technical tool for someone who has taken the time to really figure out their way around the internal structure of a PDF. I'm sure pdfedit has it's advantages. I'll post more once I've had a chance to really evaluate it.
Tuesday, April 12, 2011
Open Office 2 Google Docs Extension on Ubuntu 10.04
As I've seen in numerous posts elsewhere, I had issues installing the OO2GDocs extension for Open Office. I am running Open Office 3.2 on Ubuntu 10.04. I got the following error message:
After digging around for a while, I tried installing just the openoffice.org-java-common package from the command line. After installing that and then restarting Open Office, the OO2GDocs extension installed. However, much to my dismay, the OO2GDocs extension was non-functional.
Then I did the following:
ubuntu 10.04 error: (com.sun.star.registry.CannotRegisterImplementationException??) {{ Message = "", Context = (com.sun.star.uno.XInterface) @0}}
After digging around for a while, I tried installing just the openoffice.org-java-common package from the command line. After installing that and then restarting Open Office, the OO2GDocs extension installed. However, much to my dismay, the OO2GDocs extension was non-functional.
Then I did the following:
- Removed the OO2Docs extension from within the Extension Manager
- Shut down Open Office
- Installed the entire openoffice.org package from the command line
- Opened Open Office, and voila!

Friday, April 8, 2011
Install Wordpress 3 on Ubuntu 10.04
I installed Wordpress on a local computer running Ubuntu 10.04 this week. I did this because I am considering converting to Wordpress as a platform for publishing my business website. Most of the installation and configuration was fairly easy, however I got stuck on one step which stymied me for a few hours. So, I decided to document all of the steps I used, as none of the blogs and other websites I found had all of them in one place --- INCLUDING the installation instructions found on Wordpress' website.
Wordpress 3.1.1 Pre-requisites
Where:
'wordpress' is the desired name of the VirtualHost in Apache (use whatever name you want).
STEP 2: Create MySQL Database & User for Wordpress
Create a database for Wordpress to use with the MySQL admin user. There are numerous ways to do this (see below). I prefer to do this via the MySQL command line.
Where:
Wordpress database name = 'wordpress'
Wordpress database user name = 'wp_user'
Wordpress database user password = 'password'
Another option is to use phpMyAdmin, which provides a GUI web interface for managing MySQL servers. phpMyAdmin requires a webserver + PHP, but both of these are also requirements for Wordpress. phpMyAdmin can be useful if you're doing a lot of other things with MySQL.
Another option for a MySQL GUI tool is the MySQL Workbench.
STEP 3: Download and Extract Wordpress
Go to the Wordpress download area to get the latest version. Download and extract the wordpress directory to /var/www/wordpress (the extraction should create the wordpress directory).
STEP 4: Set Permissions for Wordpress Directory
NOTE: This was the key step where I got stuck for a while. Without setting permissions properly my web browsers did not execute the PHP files, but instead downloaded them from Apache.
Execute the following from the command line.
Where:
'user' is your username on your local host
STEP 5: Configure Wordpress for MySQL Database
Rename the sample wordpress config file from the command line:
Edit /var/www/wordpress/wp-config.php as follows:
STEP 6: Enter Wordpress Security Keys Use the online key generator to get security keys to enter into the wp-config.php file (replace each 'put your unique phrase here' with the appropriate key).
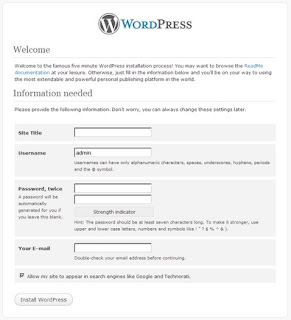
STEP 7: Run Wordpress Install Script
Open the file /var/www/wordpress/wp-admin/install.php in your web browser. You should get something like this:
Wordpress 3.1.1 Pre-requisites
- Apache 2
- MySQL 4.1.2 or >
- PHP 4.3 or >
- mod_rewrite Apache module (this is on the official Wordpress list of pre-reqs, but I did not install it and Wordpress is running fine)
- Ubuntu 10.04 installation guide for Apache 2
- Ubuntu 10.04 installation guide for MySQL
- Ubuntu 10.04 installation guide for PHP 5
user@host:$ sudo a2ensite wordpress
user@host:$ sudo /etc/init.d/apache2 restart
Where:
'wordpress' is the desired name of the VirtualHost in Apache (use whatever name you want).
STEP 2: Create MySQL Database & User for Wordpress
Create a database for Wordpress to use with the MySQL admin user. There are numerous ways to do this (see below). I prefer to do this via the MySQL command line.
user@host:$ mysql -u root -p
Enter password:

Welcome to the MySQL monitor.  Commands end with ; or \g.
Your MySQL connection id is 186
Server version: 5.1.41-3ubuntu12.10 (Ubuntu)
Type 'help;' or '\h' for help. Type '\c' to clear the current input statement.

mysql> CREATE DATABASE wordpress;
Query OK, 1 row affected (0.00 sec)

mysql> GRANT ALL PRIVILEGES ON wordpress.* TO wp_user@localhost IDENTIFIED BY password;
Query OK, 1 row affected (0.00 sec)

mysql> FLUSH PRIVILEGES;
Query OK, 1 row affected (0.00 sec)

mysql> EXIT;
Bye
user@host:$
Where:
Wordpress database name = 'wordpress'
Wordpress database user name = 'wp_user'
Wordpress database user password = 'password'
Another option is to use phpMyAdmin, which provides a GUI web interface for managing MySQL servers. phpMyAdmin requires a webserver + PHP, but both of these are also requirements for Wordpress. phpMyAdmin can be useful if you're doing a lot of other things with MySQL.
Another option for a MySQL GUI tool is the MySQL Workbench.
STEP 3: Download and Extract Wordpress
Go to the Wordpress download area to get the latest version. Download and extract the wordpress directory to /var/www/wordpress (the extraction should create the wordpress directory).
STEP 4: Set Permissions for Wordpress Directory
NOTE: This was the key step where I got stuck for a while. Without setting permissions properly my web browsers did not execute the PHP files, but instead downloaded them from Apache.
Execute the following from the command line.
user@host:$ cd /var/www
user@host:$ sudo chmod -R 0644 wordpress
user@host:$ sudo chmod -R 0755 wordpress
user@host:$ sudo chown -R user:www-data wordpress
Where:
'user' is your username on your local host
STEP 5: Configure Wordpress for MySQL Database
Rename the sample wordpress config file from the command line:
user@host:$ cd /var/www/wordpress
user@host:$ mv wp-config-sample.php wp-config.php
Edit /var/www/wordpress/wp-config.php as follows:
// ** MySQL settings - You can get this info from your web host ** //

/** The name of the database for WordPress */
define('DB_NAME','wordpress');

/** MySQL database username */
define('DB_USER','wp_admin');

/** MySQL database password */
define(<'DB_PASSWORD','wp_admin');

/** MySQL hostname */
define('DB_HOST','localhost');
STEP 6: Enter Wordpress Security Keys Use the online key generator to get security keys to enter into the wp-config.php file (replace each 'put your unique phrase here' with the appropriate key).
define('AUTH_KEY','put your unique phrase here);
define('SECURE_AUTH_KEY','put your unique phrase here)';
define('LOGGED_IN_KEY','put your unique phrase here');
define('NONCE_KEY','put your unique phrase here');
define('AUTH_SALT','put your unique phrase here);
define('SECURE_AUTH_SALT','put your unique phrase here');
define('LOGGED_IN_SALT','put your unique phrase here');
define('NONCE_SALT','put your unique phrase here');
STEP 7: Run Wordpress Install Script
Open the file /var/www/wordpress/wp-admin/install.php in your web browser. You should get something like this:

Enter your site name, an admin account username and password. Email is not really relevant if you're installing on a local server for testing like I am, however it won't hurt to put it in.
New Workout Routine
Well, I tired of my total body circuit routine and decided to go with a variation of a workout I used some years ago. My strength gains had slowed quite a bit with the total body circuit routine, and I was also struggling a bit with motivation as I was mentally tired of the same routine even though I varied the specific exercises quite a bit. This new variation of an older workout regimen is intended to maximize variety and keep my body from getting used to a specific routine. It also works well because I take the weekends off, and can choose to do some cardio or other fun activity to fill in.
Here's the basic rotation...
Week 1
Week 3 is the same as week 1. So, each week I rotate back and forth between the 3x and 2x strength training activities.
For each muscle group I do a minimum of 3 major exercises, with the exception of legs, where I do 4 in order to include a calf exercise.
The big difference between what I'm doing now and what I did when I used this workout a few years back is the following:
Mostly I use knowledge of exercises I've used in past workouts to fill my routine, however I've also been known to read articles in Men's Health on new exercises (or variations on old themes). I've found the most useful articles are when they discuss a group of exercises for targeting a specific muscle group. Here is a good link to many of them: Men's Health Fitness Lists
Here's the basic rotation...
Week 1
- Mon - stretching/warm-up, abs, chest, shoulders, triceps
- Tue - stretching/warm-up, lower back, legs, upper back, biceps
- Wed - stretching/warm-up, abs, chest, shoulders, triceps
- Thu - stretching/warm-up, lower back, legs, upper back, biceps
- Fri - stretching/warm-up, abs, chest, shoulders, triceps
- Sat - day off, optional cardio activity
- Sun - day off, optional cardio activity
- Mon - stretching/warm-up, lower back, legs, upper back, biceps
- Tue - stretching/warm-up, stretching, abs, chest, shoulders, triceps
- Wed - stretching/warm-up, lower back, legs, upper back, biceps
- Thu - stretching/warm-up, abs, chest, shoulders, triceps
- Fri - stretching/warm-up, lower back, legs, upper back, biceps
- Sat - day off, optional cardio activity
- Sun - day off, optional cardio activity
Week 3 is the same as week 1. So, each week I rotate back and forth between the 3x and 2x strength training activities.
For each muscle group I do a minimum of 3 major exercises, with the exception of legs, where I do 4 in order to include a calf exercise.
The big difference between what I'm doing now and what I did when I used this workout a few years back is the following:
- I do not use the same specific exercise twice in 1 week for the same muscle group. In other words, if I do heavy bench press for chest on Mon, I do not do heavy bench press again during that week. I use a different routine for the same muscle group each time I hit it during the week.
- I treat some days as heavy days and others as medium, or light days.
- I'll use some days to really focus on a specific muscle group, usually a muscle group where I think I can build or need more work... say shoulders or biceps. I'll go through my normal regimen, but maybe add another exercise for the muscle group I want to focus on, and do some 'super-sets.'
Mostly I use knowledge of exercises I've used in past workouts to fill my routine, however I've also been known to read articles in Men's Health on new exercises (or variations on old themes). I've found the most useful articles are when they discuss a group of exercises for targeting a specific muscle group. Here is a good link to many of them: Men's Health Fitness Lists
Subscribe to:
Posts (Atom)