Tuesday, May 3, 2011

Restore Cognos Sample Data in DB2 9.7 on Ubuntu 10.04

This documents how to set up the Cognos 8.4.1 sample database in DB2 for use with sample content (reports, analysis, queries, etc.) on Ubuntu 10.04.

System Configuration:
Lenovo Thinkpad T60 w/4Gb RAM, dual core 1.83GHz processor
Ubuntu Linux 10.04
DB2 9.7 Express C Edition
Cognos 8.4.1
Apache2

DB2 9.7 Express C Edition

This is an open source "like" version of DB2 that comes without formal support, but can be downloaded and installed for free and has support in open-source style community forums.

Install DB2 9.7 Express C Edition

1 - Install pre-requisite packages
user@host:$ sudo apt-get install libaio1 ksh libstdcc++6-4.4-dev libstdcc++6-4.4-pic
[sudo] password for user:
user@host:$

2 - Add Canonical Partners to Synaptic Package Sources List
user@host:$ sudo gedit /etc/apt/sources.list
[sudo] password for user:
user@host:$

3 - Uncomment the following lines, save file and close:

deb http://archive.canonical.com/ubuntu lucid partner
deb-src http://archive.canonical.com/ubuntu lucid partner

4 - Update Synaptic Package Sources
user@host:$ sudo apt-get update

5 - Install DB2 9.7 Express C
user@host:$ sudo apt-get install db2exc

6 - Login as the default DB2 user to verify installation
user@host:$ sudo su - db2inst1
db2inst1@host:~$

7 - Create sample DB2 database (optional)
db2inst1@host:~$ db2sampl

   Creating database "SAMPLE"...
   Connecting to database "SAMPLE"...
   Creating tables and data in schema "DB2INST1"...
   Creating tables with XML columns and XML data in schema "DB2INST1"...

   'db2sampl' processing complete.


8 - Connect to sample DB2 database
db2inst1@host:~$ db2 connect to sample

   Database Connection Information

 Database Server       = DB2/Linux 9.7.2
 SQL authorization ID  = DB2INST1
 Local database alias  = SAMPLE

db2inst1@host:~$ 

9 - Issue test queries to verify proper database creation
db2inst1@host:~$ db2 LIST TABLES

{...output...}

  47 record(s) selected.

db2inst1@host:~$ db2 "SELECT * FROM EMP"

{...output...}

  42 record(s) selected.

db2inst1@host:~$ db2stop
SQL1064N  DB2STOP processing was successful.
db2inst1@host:~$ exit
user@host:$

Now that we successfully installed DB2 9.7 and verified that it's working properly by testing with the DB2 sample database, we'll move on to working with the Cognos 8.4.1 sample data set.

Restore Cognos 8.4.1 Sample Database in DB2

1 - Create cognos user and group, set password
user@host:$ sudo addgroup cognos
[sudo] password for user:
Adding group 'cognos' (GID 1001) ...
Done.
user@host:$ sudo adduser -m -s /bin/bash -g cognos cognos
user@host:$ sudo passwd cognos
Enter new UNIX password:
Retype new UNIX password:
passwd: password updated successfully

2 - Create directory for DB2 repository, create "cognos" DB2 instance
user@host:$ cd /opt/ibm/db2/V9.7/instance
user@host:$ sudo mkdir db2repo
[sudo] password for user:
user@host:$ sudo chown -R cognos:cognos db2repo
user@host:$ sudo /opt/ibm/db2/V9.7/instance/db2icrt -u cognos cognos
DBI1070I  Program db2icrt completed successfully.

3 - Update port # and start DB2 instance.
user@host:$ sudo su - cognos
[sudo] password for user:
cognos@host:~$ db2 update dbm cfg using svcename 1999
DB20000I  The UPDATE DATABASE MANAGER CONFIGURATION command completed successfully.
cognos@host:~$ db2start
SQL1063N  DB2START processing was successful.


4 - Create Go Sales DB2 database for Cognos Samples and set code page
cognos@host:~$ db2 CREATE DATABASE GS_DB USING CODESET UTF-8 TERRITORY US
DB20000I  The CREATE DATABASE command completed successfully.
cognos@host:~$ db2set DB2CODEPAGE=1208

5 - Open DB2 command window
cognos@host:~$ db2
(c) Copyright IBM Corporation 1993,2007
Command Line Processor for DB2 Client 9.7.2

You can issue database manager commands and SQL statements from the command 
prompt. For example:
    db2 => connect to sample
    db2 => bind sample.bnd

For general help, type: ?.
For command help, type: ? command, where command can be
the first few keywords of a database manager command. For example:
 ? CATALOG DATABASE for help on the CATALOG DATABASE command
 ? CATALOG          for help on all of the CATALOG commands.

To exit db2 interactive mode, type QUIT at the command prompt. Outside 
interactive mode, all commands must be prefixed with 'db2'.
To list the current command option settings, type LIST COMMAND OPTIONS.

For more detailed help, refer to the Online Reference Manual.

db2 =>

6 - Attach to cognos DB2 instance
db2 => ATTACH TO cognos

   Instance Attachment Information

 Instance server        = DB2/LINUX 9.7.2
 Authorization ID       = COGNOS
 Local instance alias   = COGNOS

db2 =>

7 - Connect to GS_DB database
db2 => CONNECT TO GS_DB

   Database Connection Information

 Database server        = DB2/LINUX 9.7.2
 SQL authorization ID   = COGNOS
 Local database alias   = GS_DB

db2 =>

8 - Create bufferpool for GS_DB tablespace
db2 => CREATE BUFFERPOOL gs_buffer PAGESIZE 16K
DB20000I  The SQL command completed successfully.
db2 =>

9 - Create gs_data tablespace using gs_buffer bufferpool
db2 => CREATE REGULAR TABLESPACE gs_data PAGESIZE 16K MANAGED BY DATABASE USING (file 'db2repo/GS_TBS' 163840) EXTENTSIZE 16 OVERHEAD 10.5 PREFETCHSIZE 16 TRANSFERRATE 0.33 BUFFERPOOL gs_buffer DROPPED TABLE RECOVERY ON
DB20000I  The SQL command completed successfully.

db2 =>

10 - Exit from DB2 command window
db2 => quit
DB20000I  The QUIT command completed successfully.
cognos@host:~$ exit
logout
user@host:$ 

6 - Extract Cognos sample database export files for DB2

This assumes that you've already downloaded and extracted the Cognos sample data package within the Cognos main installation directory. If you haven't done this look at this post for the steps to complete first.
user@host:/opt/cognos/c8/webcontent/samples/datasources/db2$ tar -xzvf GS_DB.tar.gz
GS_DB/
GS_DB/db2move.lst
GS_DB/EXPORT.out
GS_DB/tab1.ixf
GS_DB/tab1.msg
{...output...}

7 - Change ownership and permissions on extracted files
user@host:$ sudo chown -R cognos:cognos GS_DB
[sudo] password for user:
user@host:$ sudo chmod -R 0775 GS_DB

8 - Login as cognos user and kick off the import, then go enjoy a beer... or maybe 2!
user@host:$ sudo su - cognos
cognos@host:~$ cd /opt/cognos/c8/webcontent/samples/datasources/db2/GS_DB
cognos@host:$ db2move GS_DB import -u cognos -p cognos
*****  DB2MOVE  *****

Action:  IMPORT

Start time:  Mon May  2 22:04:42 2011

Connecting to database GS_DB ... successful!  Server : DB2 Common Server V9.7.2

Binding package automatically ... /home/cognos/sqllib/bnd/db2common.bnd ... successful!

Binding package automatically ... /home/cognos/sqllib/bnd/db2move.bnd ... successful!

* IMPORT:  table "GOSALESHR"."RANKING_RESULTS"   
  -Rows read:       1898
  -Inserted:        1898
  -Rejected:           0
  -Committed:       1898

* IMPORT:  table "GOSALESHR"."RECRUITMENT"       
  -Rows read:        416
  -Inserted:         416
  -Rejected:           0
  -Committed:        416

{...output...}


* IMPORT:  table "GOSALESDW"."MRK_RTL_SURVEY_TARG_FACT"
  -Rows read:         64
  -Inserted:          64
  -Rejected:           0
  -Committed:         64


Disconnecting from database ... successful!

End time:  Mon May  2 23:18:56 2011

As you can see, it takes a while. The import took 1 hr and 14 min on my machine (which is a Lenovo Thinkpad T60P).

Create Views, Constraints, and Stored Procedures in GS_DB

1 - Edit SQL script that adds views, constraints, and stored procedures to GS_DB
user@host:$ sudo gedit /opt/cognos/c8/webcontent/samples/datasources/db2/gs_db_modify.sql
[sudo] password for user:

Change the 1st line in the file to use the correct connection information for your database. In my case this was:
connect to GS_DB user cognos using cognos

Comment out the 1st SQL statement, because it is redundant (the cognos user already has all of this authority in the GS_DB database). If you forget or don't want to comment out this line, the resulting error is benign, the SQL script will still complete successfully.
--GRANT AUTHORITIES TO USER cognos
/* GRANT  BINDADD,CONNECT,LOAD ON DATABASE  TO USER cognos
@ */

Then change all the following GRANT statements that reference the GOSALES user to your database user name (in my case cognos).
--GRANT PRIVILEGES TO USER cognos
GRANT SELECT,INSERT,UPDATE,DELETE,ALTER,INDEX,REFERENCES ON TABLE GOSALES.BRANCH TO USER cognos 
@
and so on...

Save and exit. Make certain to save the file with Unix/Linux line breaks, as it comes formatted as a Windows file and will not execute.


2 - Run SQL script to add views, constraints, and stored procedures

The included .bat file is provided to execute the SQL script on a Windows machine, however it is quite easy to run the same command on Linux.

First change ownership and permissions in the /opt/cognos/c8/webcontent/samples/datasources/db2 directory so that the cognos user can read/write.
user@host:/opt/cognos/c8/webcontent/samples/datasources$ sudo chown -R cognos:cognos db2
[sudo] password for user:
user@host:/opt/cognos/c8/webcontent/samples/datasources$ sudo chmod -R 0775 db2

Now execute the SQL script using the DB2 command:
cognos@host:/opt/cognos/c8/webcontent/samples/datasources/db2$ db2 -td@ -f gs_db_modify.sql -z gs_db_modify.log

   Database Connection Information

 Database server        = DB2/LINUX 9.7.2
 SQL authorization ID   = COGNOS
 Local database alias   = GS_DB

DB20000I  The SQL command completed successfully.

   {...output...}


You will see the following message in the command window and log file.

DB21034E  The command was processed as an SQL statement because it was not a 
valid Command Line Processor command.  During SQL processing it returned:
SQL0458N  In a reference to routine "GOSALES.ASSIGNSTAFF" by signature, a 
matching routine could not be found.  SQLSTATE=42883

It does not indicate an error, it is a result of the following SQL statement near the bottom of the SQL script, which outputs this warning if the stored procedure does not exist:
DROP PROCEDURE GOSALES.ASSIGNSTAFF (INTEGER, INTEGER)

Create Data Source Connections to Samples Databases

This took me a while to get right. Creating the data source connections is fairly straight forward, however when testing the data source connections within Cognos Administration I kept getting the following error:

QE-DEF-0285 The logon failed. 
QE-DEF-0321 The userID or password is either missing or invalid. 
RQP-DEF-0068 Unable to connect to at least one database during a multi-database attach to 1 database(s) in: 
testDataSourceConnection 

UDA-SQL-0031 Unable to access the "testDataSourceConnection" database. 
UDA-SQL-0129 Invalid login information was detected by the underlying database. 
[IBM][CLI Driver] SQL1013N The database alias name or database name "GS_DB" could not be found. SQLSTATE=42705

Unfortunately, the error codes and message did not immediately point to any resolution, so I tried a lot of different things. What it came down to was a missing environment variable that the Cognos services were looking for... DB2INSTANCE, which is supposed to be set and pointed at the DB2 instance that Cognos will use.

Since I start the Cognos Configuration Manager and services using my login, I put the following into my ~/.profile:
# Set JAVA_HOME for Cognos 8
JAVA_HOME="/usr/lib/jvm/java-6-sun/jre"
export JAVA_HOME

# Set current DB2 instance for DB2
# Required for Cognos 8 to connect to local DB2 database
DB2INSTANCE="cognos"
export DB2INSTANCE

# Add Cognos 8 install location to path
COGNOS_HOME="opt/cognos/c8"
PATH=$PATH:COGNOS_HOME/bin
export PATH

You can also just set these within the active command shell, but you'll then have to reset them every time you start Cognos. Once you have these set, shutdown the Cognos services and restart the Cognos Configuration Manager from the command line...
/opt/cognos/c8/bin/cogconfig.sh

Then start the Cognos services and open up Cognos in your web browser - http://localhost/cognos8

1 - Click on 'Administer IBM Cognos Content'


2 - Click on 'Configuration'


3 - Click on the New Data Source icon


4 - Enter 'great_outdoors_sales' as the data source name and click Next


5 - Select DB2 as the type and click Next


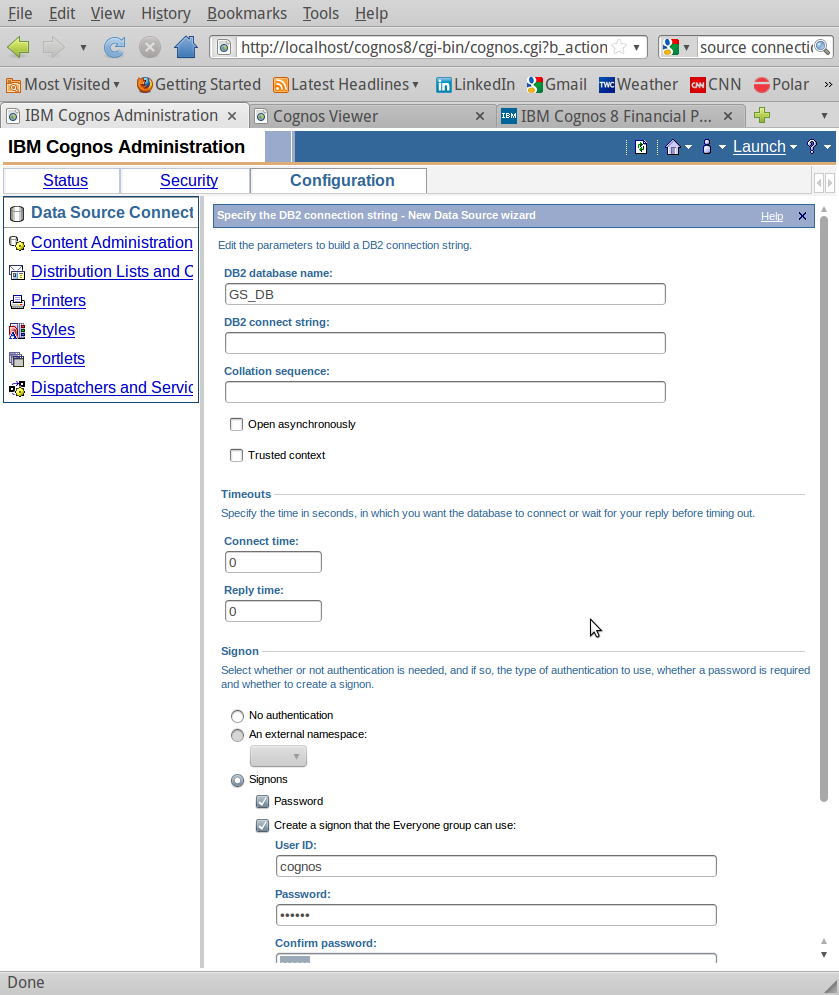
6 - Enter 'GS_DB' as the database name.

Leave everything else blank/default, except under Signon. Select Signons, Password, and 'Create a signon that the Everyone group can use.' Then enter the database user ID and password... in my case this is cognos / cognos. Then click the 'Test connection' link at the bottom.


7 - Click the 'Test' button on the next page.


8 - If you're test is successful, you'll see something like the following.


You can now start running reports against the sample data within Report Studio, Query Studio, etc.!

Sunday, May 1, 2011

Install Cognos 8.4.1 on Ubuntu 10.04

These are instructions for installing IBM Cognos 8.4.1 on Ubuntu 10.04.  I found the installation process on Ubuntu 10.04 to be quite painful due to lack of specific documentation (Ubuntu is not a supported IBM Cognos 8.x platform).  So, I documented the process I used here... mainly in case I have to repeat it on another machine... :-)

Configuration:
Ubuntu 10.04 Desktop Edition (not server)
4 Gb RAM
Intel Core Duo 1.83 GHz
Install consumed about 1Gb of disk space

Pre-requisites:
Apache2
Cognos 8.4.1 installation files already downloaded

These instructions assume you have downloaded the Cognos 8.4.1 installation files.  If using the Cognos installation CDs, look for the issetup file within the appropriate Operating System directory and run using the instructions below.  More info here.

STEP 1 - Run Cognos 8 BI Server Install

Run all of the following commands EXCEPT the last one...

user@host:$ cd ~/Downloads/DownloadDirector
user@host:$ mkdir cognos_8.4.1_bi_server
user@host:$ cd cognos_8.4.1_bi_server
user@host:$ tar -xzvf ../cognos_8.4.1_bi_server.tar.gz
user@host:$ sudo ./issetup

I initially encountered the following error:

Error while loading shared libraries: libXm.so.3: cannot open shared object file: No such file or directory.

This is because the Cognos 8.4.1 installer requires the libXm.so.3 library, which is an older version than Ubuntu 10.04 installs.  To resolve, simply install it from the repository.  I also read a few articles about creating symbolic links to later versions of libXm.so, but this was easy and I figured would create the least amount of issues with the Cognos installers.

user@host:$ sudo apt-get install libmotif3

Now, execute:

user@host:$ sudo ./issetup

Make sure you run issetup using the sudo command or you will get permissions errors if you're installing somewhere other than your home directory.

During the install process select Cognos BI server components, then select install Cognos Content Store unless you have one of the supported databases already set up.  I installed everything to:

/opt/cognos/c8


STEP 2 - Install Cognos 8 BI Samples (optional)

Run the following commands:

user@host:$ cd ~/Downloads/DownloadDirector
user@host:$ mkdir cognos_8_bi_samples
user@host:$ cd cognos_8_bi_samples
user@host:$ tar -xzvf ../cognos_8_bi_samples.tar.gz
user@host:$ sudo ./issetup

Accept the defaults, acknowledge the warning to install the Cognos 8 BI Samples into the same directory where you installed the Cognos BI server components, in my case this was:

/opt/cognos/c8

If you want to use the Cognos sample data, after completing the Cognos installation steps you'll need to:
  1. Restore the sample databases
  2. Set up data source connections within Cognos for the sample databases
  3. Import the sample content (reports, queries, etc.)
NOTE ON SAMPLE DATA: Although you can import the sample content into the Apache Derby database that comes with Cognos 8.4.1, the sample database backup files are only provided in Oracle and DB2 format. If you are not running either Oracle or DB2, you can choose to only import the sample content into the Derby database (assuming you selected the option to install the Cognos Content Store during the install). This will allow you to view reports, queries, etc. within Report Studio, Query Studio, Analysis Studio, etc. however you will not actually be able to run any of the reports against a database and view the results.

If you want to use the Cognos 8 sample data, see my instructions on setting up the Cognos 8 sample data in DB2.

STEP 3 - Set Java environment, configure Cognos 8, and start Cognos services

First copy the Cognos java encryption file to your JAVA_HOME/jre/lib/ext directory.

In my case, JAVA_HOME=/usr/lib/jvm/java-6-sun

user@host:$ sudo cp /opt/cognos/c8/bin/jre/1.5.0/lib/ext/bcprov-jdk14-134.jar /usr/lib/jvm/java-6-sun/jre/lib/ext/bcprov-jdk14-134.jar

Don't worry about the fact that Cognos 8 shipped with java 5, it will run with java 6.

Next is where I ran into a couple of tough issues... I did a ton of things to try and get the Cognos Configuration Manager to run.  You start the Cognos Configuration Manager with the following command:

user@host:$ cd /opt/cognos/c8/bin
user@host:$ ./cogconfig.sh

However, I could not get it to run.  First I ran into a permissions issue, then a JAVA_HOME environment variable issue, and an X-windows display issue.  Here's what I finally did to resolve:

user@host:$ sudo chown -R user:cognos /opt/cognos
user@host:$ JAVA_HOME=/usr/lib/jvm/java-6-sun/jre ./cogconfig.sh

Where user = your user name

I had created a cognos user and group on my Ubuntu system and had been trying to run the Cognos Configuration Manager under that user id, however no matter what I tried (editing ~/.profile or /etc/bash.bashrc) the utility came back with a JAVA_HOME undefined error and exited.  Even when I passed the correct java path in the command statement.  However, I found that if I changed ownership of the entire /opt/cognos directory structure to my user name, and also passed the correct java path in the command statement... voila, almost...

Then, I got another error about being unable to find libstdc++5... this is because Ubuntu 10.04 has a newer version, and libstdc++5 is no longer in the software repository, so

user@host:$ sudo apt-get install libstdc++5

will not work.

error: 27/04/2011,13:49:21,Err,java.lang.UnsatisfiedLinkError: /opt/cognos/c8/bin/libJCAM_Crypto_JNI.so: libstdc++.so.5: cannot open shared object file: No such file or directory, com.cognos.crconfig.CRConfigFrame.initDataManager(CRConfigFrame.java:549)

To resolve the above error, go here, and download the libstdc++5 package, and install.  Then re-run:

user@host:$ JAVA_HOME=/usr/lib/jvm/java-6-sun/jre ./cogconfig.sh

The Cognos Configuration Manager should now run without issue.  Follow the IBM guide for configuration of Cognos 8 located here.  The link is to the page called Start the IBM Cognos 8 Services under Installing and Configuring IBM Cognos 8 Components on One Computer.  If you're setting up a test environment on a single server with the Cognos Content Store as your database, then you can skip the security, mail server account, and data source connections.  The tests all completed successfully, and I was able to start the Cognos services without issue.

STEP 4 - Configure Apache

A correct, or perhaps I should say a "functional," Apache configuration for Cognos 8.4.1 on Ubuntu 10.04 eluded me for quite some time.  First, I set up virtual sites and the appropriate config files, but still could not get Cognos to work.  I dealt with permissions issues causing 403 errors, 404 errors, and cgi binaries downloading within the browser instead of being executed by the server.  The last issue with cgi binaries was the issue that held me up for quite some time.

Give Apache Access to c8 Directory & Change Permissions

user@host:$ sudo chmod -R 0775 /opt/cognos/c8
user@host:$ sudo chown -R user:www-data /opt/cognos/c8

Assigning ownership to the www-data group ensures that the Apache web server has access.

Set up Virtual Site for Cognos8

First create a cognos8 file in /etc/apache2/sites-available from a copy of the default file.  Then execute the a2ensite command to tell Apache to enable the new virtual site.

user@host:$ sudo cp /etc/apache2/sites-available/default /etc/apache2/sites-available/cognos8
user@host:$ sudo a2ensite cognos8

Edit the Cognos8 Virtual Site Configuration

Edit the cognos8 file located in /etc/apache2/site-available. Change your entry as appropriate based on your directory locations.

<VirtualHost *:80>
 ServerAdmin webmaster@localhost 

 DocumentRoot /var/www/cognos8

 <Directory />
  Options FollowSymLinks
  AllowOverride All
 </Directory>

 ScriptAlias cognos8/cgi-bin/ /var/www/cognos8/cgi-bin/
 <Directory "/var/www/cognos8/cgi-bin">
  AllowOverride FileInfo
  Options +ExecCGI -MultiViews +SymLinksIfOwnerMatch
  SetHandler cgi-script
  Order Allow,Deny
  Allow from All
 </Directory>

 Alias cognos8 /var/www/cognos8
 <Directory /var/www/cognos8/>
  Options FollowSymLinks
  AllowOverride FileInfo
  Order Allow,Deny
  Allow from All
 </Directory>

Edit the Default Virtual Site Configuration

Edit the default file located in /etc/apache2/site-available. Change your entry as appropriate based on your directory locations. SPECIAL NOTE: the key change in this file was adding the ScriptAlias for cognos8/cgi-bin. Until I did that, Apache just downloaded the cgi binaries to my web browser instead of executing them.

<VirtualHost *:80>
 ServerAdmin webmaster@localhost

 DocumentRoot /var/www
 <Directory />
  Options FollowSymLinks
  AllowOverride All
 </Directory>
 <Directory /var/www/>
  Options Indexes FollowSymLinks MultiViews
  AllowOverride All
  Order allow,deny
  allow from all
 </Directory>

 ScriptAlias /cgi-bin/ /usr/lib/cgi-bin/
 <Directory "/usr/lib/cgi-bin">
  AllowOverride None
  Options +ExecCGI -MultiViews +SymLinksIfOwnerMatch
  Order allow,deny
  Allow from all
 </Directory>

 ScriptAlias cognos8/cgi-bin/ /var/www/cognos8/cgi-bin/
 <Directory "/var/www/cognos8/cgi-bin">
  AllowOverride FileInfo
  Options +ExecCGI -MultiViews +SymLinksIfOwnerMatch
  SetHandler cgi-script
  Order Allow,Deny
  Allow from All
 </Directory>

Restart Apache

user@host:$ sudo /etc/init.d/apache2 restart

Test Cognos

Go to http://localhost/cognos8 in your browser, if you've done everything correctly, you should see the Welcome to IBM Cognos 8 screen in Cognos Connections:

Thursday, April 28, 2011

Ubuntu's Achilles Heel is MS Office Compatibility

I'm sure some disagree, but I believe if Ubuntu, and Linux in general, had a better answer for Microsoft Office compatibility it would open up the floodgates to adoption by the business community.  Until that time, the adoption rate within the business community will be slow.

I currently run Ubuntu 10.04 both at home, and at work.  I've been running Ubuntu Linux since 2007 when I began using Ubuntu Feisty Fawn (7.04).  Since that time I've gradually migrated all of my personal systems from Windows, with the exception of a couple of Macs.  I consider those migrations a major step for someone who started his career administering Windows servers and had an MCSE in Microsoft Windows NT 4.0.  At home I am able to work my way around the few minor annoyances that still come up.  I run a Windows XP virtual machine in order to run Apple's iTunes software.  Although the Music One store within Ubuntu has come a long way, it still does not measure up to the capability to create Genius mixes within iTunes and also leverage Genius in order to identify new music.  Additionally, functional iPod playlist management still seems to elude the developers of Rhythmbox, so I end up running Rhythmbox to purchase/download music or I download from the Amazon music store... then I run gtkpod to create and manage playlists.  Each of these issues are mildly annoying, but I am willing to deal with them given the many benefits of running Ubuntu Linux.

Similarly, I began running Ubuntu Linux on my work systems some years ago.  I own a small business, and I find it very advantageous to have free software that runs great on older systems without a ton of overhead, doesn't require constant monitoring for viruses/spyware, has great community support, and offers plenty of software with great functionality.  I have found many great open source software products  to do most everything I need... however a major issue for me continues to exist in the area of office applications.

I'm currently running Open Office 3.2, which comes with Ubuntu.  I've installed a number of Open Office plugins as well.  Although Open Office is great in working with documents in Open Office format, I have found sharing and collaborating with customers and partners who run Microsoft Office to be painful.  Whether it is dealing with Microsoft Word formatted contract documents with change tracking, sophisticated spreadsheets, or working together on an Microsoft PowerPoint formatted slide presentation, Open Office simply cannot deal with detailed formatting.  The same issue exists with Google Docs.  Although Google Docs is an excellent platform for sharing and collaborating, it does not handle detailed formatting in complex documents when exchanging multiple document versions with Microsoft Office users.  Unfortunately, in order to work effectively with both customers and partners, I've had no other choice than to purchase copies of MS Office.  Of course, I can run Microsoft Office on my Windows XP virtual machine, but at that point it starts to defeat the purpose of running Ubuntu Linux in the first place.

With version 11 release of Ubuntu (Natty Narwal) coming on Apr 28, Open Office is no longer the default office suite that comes with Ubuntu, it is now LibreOffice.  However, while LibreOffice does mark a break with the Sun/Oracle control of direction for the OpenOffice codebase, it does not offer any significant new functionality for open source software users at this time... at least not yet.

This is the reality of the business user community.  My customers and partners all run Microsoft Office, and although I anxiously await the day when this is no longer true... in order to work effectively with them I must have Microsoft Office.

Sunday, April 24, 2011

Wordpress Plugin: WP Super Cache on Ubuntu 10.04

I am in what is perhaps a unique situation... I started using Blogger a while back for my personal blog, but my business site is hosted at GoDaddy.com and uses WordPress 3.1.1.  I've found WordPress to be an excellent web platform, and at this point I'm debating continuing to use Blogger, but I suppose I'll figure that out at some point later...  One issue I ran into was performance of my business website using WordPress.  After some research, I decided to try out the WP Super Cache plugin in order to improve response times for page requests.  Funnily enough, it turned out to be much easier to install and configure the WP Super Cache plugin on GoDaddy.com than on my local server.  Of course, by the time I installed on GoDaddy I had spent some time with it and was a bit more familiar with it.  That said, the GoDaddy.com folks seem to have all permissions and pre-requisites in place in order to use this plugin, because it installed and activated without any issues at all.

I set up a WordPress test environment on a machine running Ubuntu 10.04 so that I can implement and preview all changes prior to rolling them out live.  There are a lot of instructions, notes, and other items related to installing the WP Super Cache plugin, however nothing seemed to work for my particular configuration.  I ended up having to do quite a bit of searching around to figure out how to get everything to work and so I decided to document what I found to work on my system.  My server config:
Ubuntu 10.04
WordPress 3.1.1
Apache2 (standard install via synaptic)
New install of WP Super Cache plugin (I did not have the WP Cache plugin)
STEP 1 - Download WP Super Cache plugin

You can download it here, or within the WordPress management console.

STEP 2 - Extract plugin files to WordPress Plugin directory and set permissions

The WordPress plugin directory is located in

../wordpress_root/wp-content/plugins

Set permissions via the command line:

user@host:$ cd ../wordpress_root/wp-content/plugins
user@host:$ sudo chmod -R 0755 wp-super-cache

STEP 3 - Install required modules for Apache
rewrite
mime (this was already installed on my system)
headers
expires
The command to install these modules is

user@host:$ sudo a2enmod rewrite

After installing all required modules you will need to restart Apache, however wait until after the following tasks to do this, as otherwise you'll have to do it twice.

STEP 4 - Add configuration entries for Apache

Edit the following files located in /etc/apache2/sites-available:
wordpress
default* - Make sure you edit this file as well as the wordpress file, I failed to do so initially and it took me quite a bit of troubleshooting before I made the same changes to default and got things to work.
 I just executed the following command to edit in gedit:

user@host:$ sudo gedit /etc/apache2/sites-available/wordpress

Here's what I have at the top of the wordpress file:

<virtualhost *:80="">
 ServerAdmin webmaster@localhost

 DocumentRoot /var/www/wordpress
 <directory>
  Options FollowSymLinks
  AllowOverride All
 </directory>
 <directory var="" www="">
  Options Indexes FollowSymLinks MultiViews
  AllowOverride All
  Order allow,deny
  allow from all
 </directory>

Here's what I have at the top of the default file:

<virtualhost *:80="">
 ServerAdmin webmaster@localhost

 DocumentRoot /var/www
 <directory>
  Options FollowSymLinks
  AllowOverride All
 </directory>
 <directory var="" www="">
  Options Indexes FollowSymLinks MultiViews
  AllowOverride All
  Order allow,deny
  allow from all
 </directory>
</virtualhost>

Now restart apache:

user@host:$ sudo /etc/init.d/apache2 restart

STEP 5 - Activate Permalinks within WordPress

The WP Super Cache plugin requires that "pretty links" be enabled in order to function.  This is of course also beneficial for aesthetic reasons, as well as SEO, but is also a necessary step here. All you have to do is select something other than the default.  You can either use one of the available options such as Day and Name or Month and Name.  If you don't like any of the available options, see the WordPress Permalink documentation for some of the other variables to construct you own structure and put it into the custom field.

Permalink Settings in WordPress Admin Console

STEP 6 - Activate WP Super Cache plugin within WordPress and configure

Once you've completed all of the steps above, you should be able to activate the WP Super Cache plugin within the Plugin screen of the WordPress Admin Console and then enable caching.

Once you've activated the WP Super Cache plugin go to the WP Super Cache Control Panel under Settings in the WordPress Admin Console.  Select the radio button next to Caching On (Recommended)

Enable Caching in WP Super Cache Settings

Once you do this, if you scroll down the settings page, you will probably see a notification about needing to update the .htaccess file in the WordPress directory.  Provided the permissions are correctly set in your root WordPress directory, WordPress should have generated an .htaccess file for you and inserted the appropriate entries when you changed your Permalinks setting to a custom definition.  If you get error messages about .htaccess make sure that the following permissions are set on your WordPress directory:

user@host:$ sudo chown -R user:www-data [wordpress_root_directory_location]/wordpress
user@host:$ sudo chmod -R 0755 [wordpress_root_directory_location]/wordpress

Once that is done, WordPress should be able to update your .htaccess file without issue.  Scroll down the settings page and look for a notification that your Mod Rewrite rules are out of sync and need to be updated.  Click on the Update Rewrite Rules button and you should see a screen similar to that below.

Apache mod rewrite rules updated successfully by WordPress

I also enabled a few options under the Advanced tab, which I can confirm work fine on GoDaddy.com

Advanced tab under WP Super Cache Settings

Good luck, hopefully this works for you too.

Saturday, April 16, 2011

pdftk - Awesome Tool for Working with PDF Files

PDFTK

I happened upon pdftk a few months back when searching for an open source tool for working with PDF files on Ubuntu 10.04.  pdftk is a command line tool that runs on many Linux variants, Mac OS, and Windows.  Although not a full fledged PDF editor, pdftk is a great tool for manipulating existing PDF documents via the command line.

 The main activities I've used pdftk for:
  • merging multiple PDF documents
  • splitting a PDF into multiple documents
  • adding pages to a PDF
  • rotating pages within a PDF
pdftk is very easy to use, and a quick glance at the examples is all it takes to get going.

PDF Import Extension for Open Office

The PDF import extension for Open Office has worked well in certain situations, however it does not do well with tables and a lot of custom formatting.  However, for editing and republishing PDFs with basic formatting, it works like a champ.

Open Office extensions are very easy to install via the Extension Manager.  However, here is a guide if this is your first time using Open Office extensions.
pdfedit

pdfedit is another option that I've seen referenced numerous times.  I've played with it only a little.  It looks to me like a rather technical tool for someone who has taken the time to really figure out their way around the internal structure of a PDF.  I'm sure pdfedit has it's advantages.  I'll post more once I've had a chance to really evaluate it.

Tuesday, April 12, 2011

Open Office 2 Google Docs Extension on Ubuntu 10.04

As I've seen in numerous posts elsewhere, I had issues installing the OO2GDocs extension for Open Office.  I am running Open Office 3.2 on Ubuntu 10.04.  I got the following error message:

ubuntu 10.04 error: (com.sun.star.registry.CannotRegisterImplementationException??) {{ Message = "", Context = (com.sun.star.uno.XInterface) @0}}

After digging around for a while, I tried installing just the openoffice.org-java-common package from the command line.  After installing that and then restarting Open Office, the OO2GDocs extension installed.  However, much to my dismay, the OO2GDocs extension was non-functional.

Then I did the following:
  • Removed the OO2Docs extension from within the Extension Manager
  • Shut down Open Office
  • Installed the entire openoffice.org package from the command line
  • Opened Open Office, and voila!
After doing this, I was able to install and use the gdocs_2.3.1.oxt extension in Open Office 3.2 without issue:

Friday, April 8, 2011

Install Wordpress 3 on Ubuntu 10.04

I installed Wordpress on a local computer running Ubuntu 10.04 this week.  I did this because I am considering converting to Wordpress as a platform for publishing my business website.  Most of the installation and configuration was fairly easy, however I got stuck on one step which stymied me for a few hours.  So, I decided to document all of the steps I used, as none of the blogs and other websites I found had all of them in one place --- INCLUDING the installation instructions found on Wordpress' website.

Wordpress 3.1.1 Pre-requisites
  • Apache 2
  • MySQL 4.1.2 or >
  • PHP 4.3 or >
  • mod_rewrite Apache module (this is on the official Wordpress list of pre-reqs, but I did not install it and Wordpress is running fine)
The installation for Apache, MySQL, and PHP on Ubuntu 10.04 are well documented, so I have not attempted to recreate these:
STEP 1: Create Apache VirtualHost for Wordpress

user@host:$ sudo a2ensite wordpress
user@host:$ sudo /etc/init.d/apache2 restart

Where:
'wordpress' is the desired name of the VirtualHost in Apache (use whatever name you want).

STEP 2: Create MySQL Database & User for Wordpress

Create a database for Wordpress to use with the MySQL admin user.  There are numerous ways to do this (see below).  I prefer to do this via the MySQL command line.

user@host:$ mysql -u root -p
Enter password:

Welcome to the MySQL monitor.  Commands end with ; or \g.
Your MySQL connection id is 186
Server version: 5.1.41-3ubuntu12.10 (Ubuntu)
Type 'help;' or '\h' for help. Type '\c' to clear the current input statement.

mysql> CREATE DATABASE wordpress;
Query OK, 1 row affected (0.00 sec)

mysql> GRANT ALL PRIVILEGES ON wordpress.* TO wp_user@localhost IDENTIFIED BY password;
Query OK, 1 row affected (0.00 sec)

mysql> FLUSH PRIVILEGES;
Query OK, 1 row affected (0.00 sec)

mysql> EXIT;
Bye
user@host:$ 

Where:
Wordpress database name = 'wordpress'
Wordpress database user name = 'wp_user'
Wordpress database user password = 'password'

Another option is to use phpMyAdmin, which provides a GUI web interface for managing MySQL servers.  phpMyAdmin requires a webserver + PHP, but both of these are also requirements for Wordpress.  phpMyAdmin can be useful if you're doing a lot of other things with MySQL.
Another option for a MySQL GUI tool is the MySQL Workbench.

STEP 3: Download and Extract Wordpress

Go to the Wordpress download area to get the latest version.  Download and extract the wordpress directory to /var/www/wordpress (the extraction should create the wordpress directory).

STEP 4: Set Permissions for Wordpress Directory

NOTE: This was the key step where I got stuck for a while.  Without setting permissions properly my web browsers did not execute the PHP files, but instead downloaded them from Apache.

Execute the following from the command line.

user@host:$ cd /var/www
user@host:$ sudo chmod -R 0644 wordpress
user@host:$ sudo chmod -R 0755 wordpress
user@host:$ sudo chown -R user:www-data wordpress

Where:
'user' is your username on your local host

STEP 5: Configure Wordpress for MySQL Database

Rename the sample wordpress config file from the command line:

user@host:$ cd /var/www/wordpress
user@host:$ mv wp-config-sample.php wp-config.php

Edit /var/www/wordpress/wp-config.php as follows:

// ** MySQL settings - You can get this info from your web host ** //

/** The name of the database for WordPress */
define('DB_NAME','wordpress');

/** MySQL database username */
define('DB_USER','wp_admin');

/** MySQL database password */
define(<'DB_PASSWORD','wp_admin');

/** MySQL hostname */
define('DB_HOST','localhost');

STEP 6: Enter Wordpress Security Keys Use the online key generator to get security keys to enter into the wp-config.php file (replace each 'put your unique phrase here' with the appropriate key).

define('AUTH_KEY','put your unique phrase here);
define('SECURE_AUTH_KEY','put your unique phrase here)';
define('LOGGED_IN_KEY','put your unique phrase here');
define('NONCE_KEY','put your unique phrase here');
define('AUTH_SALT','put your unique phrase here);
define('SECURE_AUTH_SALT','put your unique phrase here');
define('LOGGED_IN_SALT','put your unique phrase here');
define('NONCE_SALT','put your unique phrase here');

STEP 7: Run Wordpress Install Script

Open the file /var/www/wordpress/wp-admin/install.php in your web browser.  You should get something like this:


Enter your site name, an admin account username and password.  Email is not really relevant if you're installing on a local server for testing like I am, however it won't hurt to put it in.

New Workout Routine

Well, I tired of my total body circuit routine and decided to go with a variation of a workout I used some years ago. My strength gains had slowed quite a bit with the total body circuit routine, and I was also struggling a bit with motivation as I was mentally tired of the same routine even though I varied the specific exercises quite a bit.  This new variation of an older workout regimen is intended to maximize variety and keep my body from getting used to a specific routine. It also works well because I take the weekends off, and can choose to do some cardio or other fun activity to fill in.

Here's the basic rotation...

Week 1
  • Mon - stretching/warm-up, abs, chest, shoulders, triceps
  • Tue - stretching/warm-up, lower back, legs, upper back, biceps
  • Wed - stretching/warm-up, abs, chest, shoulders, triceps
  • Thu - stretching/warm-up, lower back, legs, upper back, biceps
  • Fri - stretching/warm-up, abs, chest, shoulders, triceps
  • Sat - day off, optional cardio activity
  • Sun - day off, optional cardio activity
Week 2
  • Mon - stretching/warm-up, lower back, legs, upper back, biceps
  • Tue - stretching/warm-up, stretching, abs, chest, shoulders, triceps
  • Wed - stretching/warm-up, lower back, legs, upper back, biceps
  • Thu - stretching/warm-up, abs, chest, shoulders, triceps
  • Fri - stretching/warm-up, lower back, legs, upper back, biceps
  • Sat - day off, optional cardio activity
  • Sun - day off, optional cardio activity

Week 3 is the same as week 1.  So, each week I rotate back and forth between the 3x and 2x strength training activities.

For each muscle group I do a minimum of 3 major exercises, with the exception of legs, where I do 4 in order to include a calf exercise.

The big difference between what I'm doing now and what I did when I used this workout a few years back is the following:
  1. I do not use the same specific exercise twice in 1 week for the same muscle group.  In other words, if I do heavy bench press for chest on Mon, I do not do heavy bench press again during that week.  I use a different routine for the same muscle group each time I hit it during the week.
  2. I treat some days as heavy days and others as medium, or light days.
  3. I'll use some days to really focus on a specific muscle group, usually a muscle group where I think I can build or need more work... say shoulders or biceps.  I'll go through my normal regimen, but maybe add another exercise for the muscle group I want to focus on, and do some 'super-sets.'
At this point I haven't drawn up formal workout plans for each day, mainly because I wanted as much variety as possible, and the flexibility to incorporate new exercises I run across.  Sometimes I waste a few min at the beginning of the session figuring out the exercises and remembering what I did earlier in the week, but I've gotten pretty good at doing this during my stretching/warm-up.

Mostly I use knowledge of exercises I've used in past workouts to fill my routine, however I've also been known to read articles in Men's Health on new exercises (or variations on old themes).  I've found the most useful articles are when they discuss a group of exercises for targeting a specific muscle group.  Here is a good link to many of them:  Men's Health Fitness Lists

Tuesday, February 22, 2011

Removing Header & Footer from Firefox 3.6.1 Printing

Here are some instructions on how to remove the header and footer while printing from Firefox 3.6.1 on Ubuntu 10.04.

Type 'about:config' in the URL bar and hit Enter. You will see a warning about altering the browser configuration.


Acknowledge the warning and move on.

Filter using 'header.' Before modifying, you may want to take a screenshot of the existing values in case you want to add them back in the future. Alter the printing preferences associated with 'header' by right-clicking and selecting 'modify.' Remove the current values.


Repeat this process using 'footer.'

Now all printouts from within Firefox should be without the header and footer information.

Removing image borders in Impress

This was an issue I'd come across on several occasions, which I found to be highly annoying. Basically, when I inserted an image into a slide in Impress, it would appear with a light gray-scale border. Sometimes the border would appear when in slide edit mode, and other times it would only appear when in slideshow mode.

I found reference to a number of different possible resolutions on various forums. The fix that worked for me was to disable hardware-acceleration under Tools->Options->View.


I did all of this on Ubuntu 10.04 with Open Office 3.2.